Driver for Compaq Presario CQ20-105TU Windows XP
Intel Chipset Installation Utility for ICH9:
ftp://ftp.hp.com/pub/softpaq/sp39001-39500/sp39316.exe
Intel Video Driver and Control Panel
ftp://ftp.hp.com/pub/softpaq/sp39501-40000/sp39880.exe
VGA/Video Driver.
http://tinyurl.com/6ya6rc
MS UAA (required with a reboot before Audio driver)
here:
ftp://ftp.hp.com/pub/softpaq/sp33501-34000/sp33867.exe
ADI SoundMAX AD1984A Audio Driver
here:
ftp://ftp.hp.com/pub/softpaq/sp39501-40000/sp39695.exe
High-Definition Audio (HDA) Modem Installer and Driver
ftp://ftp.hp.com/pub/softpaq/sp39501-40000/sp39545.exe
.Net Framework(required before Quick Launch):
http://tinyurl.com/758p8
HP Quick Launch Buttons
ftp://ftp.hp.com/pub/softpaq/sp39001-39500/sp39425.exe
Reset Counter Canon i250, i255, i350, i355
To reset waste ink counter pad in Canon i250, i255, i350, i355 there are two Steps, that is reset manual and reset use software resetter (general tool). Whereas reset manual any two methode can be used. Here Complete tutorial to reset waste ink counter for Canon i250, i255, i350, i355 printers.
Manual Reset for Canon i250, i255, i350, i355
Methode 1 : Manual for service mode
- Unplug power cable from electric source and USB cable from computer.
- Open the printer cover and hold power button.
- Connect power cable to the electric source.
- Close the printer cover then release power button.
Methode 2: Manual for service mode
- Turn off the printer. And disconnect the printer cable.
- Press and hold the POWER button, turn on the printer.
- The indicator LED should be green.
- Press and release the RESUME button , the indicator LED should be orange.
- Press and release the RESUME button again, the indicator LED should be green.
- Release both buttons.
Resettting using software resetter canon i250, i255, i350, i355
- Reconnect the printer cable.
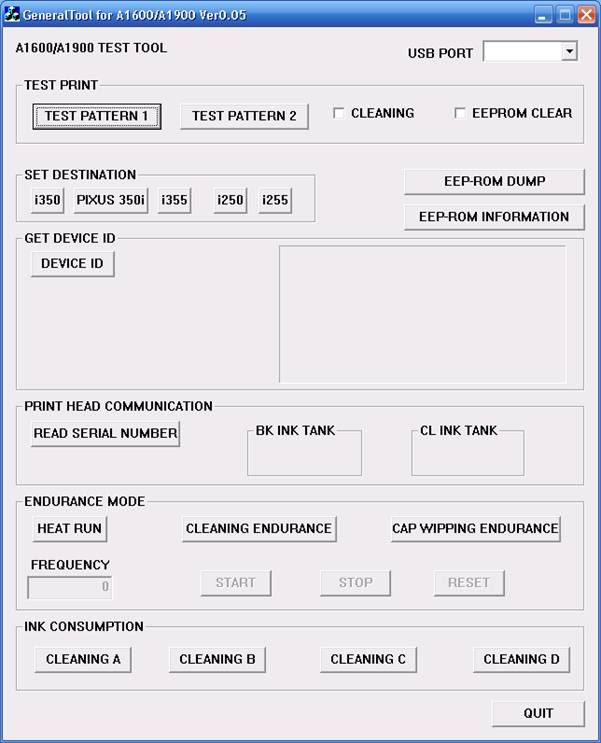
- Download and Run General Tools/software resetter for Canon printers i250, i255, i350, i355.
- Then select USB PORT where your printer installed.
- Choose printer type in SET DESTINATION sections and printer should be reset.
Note : After service mode use software for permanent reset Canon i250, i255, i350, i355

W32/Sality Virus - Unhiding the Folders
Here’s the code:
' Reset the file attributes of All the Folder in a specific Drive
' Change Z:\ to the drive letter where you want the change will happen.
cDrive = "Z:\"
Set FSO = CreateObject("Scripting.FileSystemObject")
ShowSubfolders FSO.GetFolder(cDrive)
WScript.Echo "Done with fix."
Sub ShowSubFolders(Folder)
str = ""
For Each Subfolder in Folder.SubFolders
str = str & " " & Subfolder.Path
subFolder.Attributes = 0
ShowSubFolders Subfolder
Next
End Sub
sumber : http://www.bleuken.com/2009/02/23/w32sality-virus-unhiding-folders/
Installing XP with MassStorage(SATA/RAID) Drivers
Can't find HDD in XP Setup ? For HP Compaq Presario V3000 series...
Please follow the step by step as below:
1. download Intel Mass Storage(Intel 3600) from HP Compaq Presario driver page.
2. extract the 'SP32492.exe' in any other machine (it will go to c:\spsetup\SP32492 by default).
3. copy c:\spsetup\SP32492\*.* into your USB thumb drive.
4. attach your USB floppy drive into HP Compaq Presario V3000 laptop.
5. boot up from Windows XP installation disk.
6. look at bottom of the installation screen and hit F6 when it said F6 blah blah….
7. insert a floppy disk into external USB floppy drive, press "S" for supplier hardware device support disk. Select Intel 82801HEM/HBM SATA AHCI Controller(iaStor.sys).
8. basically the Intel Mass Storage SATA/RAID drivers loaded.
9. Windows XP installation continue for now.
5 problems in Internet Explorer 8
1. Compatibility issues.

The Acid 3 test for compatibility ensures that the browser works well with technologies such as CSS, HTML4 and XHTML. However, the test reveals that IE8 falls far short of scores delivered by other new browser software from Google and Mozilla.
This failure could especially be a huge stumbling block for developers as they rely on these standards to make sure their work can run across many different browsers and on different OSes.
Microsoft had earlier warned that IE8's default support for some new Internet standards may cause problems with their sites. Explorer 8 includes a tool called Compatibility View that lets users view sites built for previous editions of the browser.
2. Still slow.

According to JavaScript rendering tests run by Computerworld, the final version of IE8 is only slightly faster than the browser's Release Candidate 1, which Microsoft released in January.
According to the test findings (which appeared in Computerworld) Google Inc's Chrome led all browsers in the SunSpider tests, making it more than four times faster than IE8. Second was Mozilla Corp's Firefox 3.0.7, followed by Apple Inc's Safari 3.2.2 for Windows and Opera Software's Opera 9.63.
Firefox proved to be 59 per cent faster than IE8, while Safari was 47 per cent faster. Opera, the slowest non-Microsoft production browser, was still 38 per cent faster than IE8.
Walt Mossberg, the personal-technology columnist for The Wall Street Journal, criticised IE 8's performance in an All Things Digital post, "Microsoft claims IE 8 is very fast, but in my tests, speed and performance were its worst attributes. Using two computers, one running Windows XP and one running Windows Vista, I timed the loading of a half-dozen popular Web sites, plus two folders containing numerous news and sports sites. I repeated the test in IE 8, and in Firefox, Safari 4, and Chrome. In every case, IE 8 loaded the pages and folders more slowly than most of the other browsers, and in most cases, it came in dead last."
Incidentally, Microsoft said that its own speed tests prove Internet Explorer 8 (IE8) to be faster than both Firefox and Chrome.
3. Hacked!.

At a security conference last week in Canada, a hacker exploited a security hole in Microsoft's new Internet Explorer 8 in under two hours, taking control of a Sony laptop running an internal build of Windows 7.
The 25-year-old German researcher won $5,000 and a Sony laptop in the annual contest PWN2OWN that invites hackers to worm their way into popular browsers and operating systems for prize money.
Later, Microsoft confirmed for TippingPoint's Digital Vaccine Laboratories that the IE8 vulnerability was genuine. It is still unknown whether the vulnerability exists only on Windows 7.
4. No final support for Windows 7.

Microsoft has not confirmed when the final version of IE8 will be available for Windows 7, but it is expected in the next public release for Windows 7.
Also, IE8 can only be downloaded from www.microsoft.com/ie8 or Microsoft's Download Center. Microsoft has not specified when it will push IE8 through the Windows Update service.
5.

However, many experts believe that Microsoft's latest technology to protect Internet Explorer users from clickjacking will not fix the problem. According to them, it won't be a panacea cure-all, but it may help. Researches believe that the problem is so vast that Microsoft's approach, which works only when developers add special tags to their pages that prevent their own Web buttons from being misused, may end up giving IE users a false sense of security.
Microsoft released the technology as part of an early test version of its Internet Explorer 8 browser, saying that the company had developed "consumer-ready" protection for an attack.
Clickjacking enables an attacker to force a user click on an invisible link, obviously without his knowledge or consent. Once a user clicks the link unknowingly, the hacker takes over the control.
Sumber : http://www.fropki.com/problems-internet-explorer-vt34740-5.html
My Bootdisk 2.95 - system-repairing utilities
|
Description:
My Boot Disk creates start-up disk with mouse support and dozens of system-repairing utilities, including boot-up fix, file extraction, drive partitioning, rapid installation, disk format, Attributes change, file deletion, file copy, disk scan and more. It installs Windows faster, troubleshoots varieties of boot or crash problems and discover potential file damage.
This new version is Windows Vista compatible.
Please select a mirror for free download My BootDisk 2.95:
http://www.qwerks.com/download/6498/mybootdisk.exe
http://www.zhangduo.com/mybootdisk.exe
Install Windows XP on SATA without a Floppy (F6)
SATA hard drives have become more and more appreciated tending to substitute the IDE drives due to the increasing speed they offer. Motherboard manufacturers started to implement the new standard years ago, when the technology was young and expensive. Now, as the SATA HDD prices have lowered to a level where anybody can afford to choose a SATA enabled HDD instead of an IDE one, a great migration has been observed among the common computer users.
They choose to install Windows and applications on SATA drives because they provide more speed which determines the system to run smoother. Thus, for those owning older mainboards with SATA support an extra step is required while attempting to install Windows XP. Windows XP does not provide drivers for all the SATA controllers, therefore, during the installation procedure, the user must insert a floppy with the drivers that came in the package along with the motherboard.
Not a big deal, not much effort, but the funny thing is that a great number of people passed on their floppy drives. Under these circumstances, no floppy means the impossibility to install Windows XP on SATA (on some mainboards). The result? The installation guide simply won’t detect the SATA HDD.
People that were happy they got rid of the old removable drive have now motives to worry. Some may reconsider buying new floppy drives for their computers. Even if I wrote in a precedent article about the utility of the floppy drive, I do not encourage spending your money buying back an obsolete piece of hardware. I will present you a method to avoid this inconvenient by doing a software trick.
Let’s take it slow. Where is the problem? We have a driver problem strictly because the SATA driver we need does not come embedded in the Windows XP installation package. What if we add the driver by ourselves before installing Windows?
What ingredients are involved in this operation? The original Windows XP Installation CD, a freeware application named NLite and a blank CD. Moreover, we need the drivers for the SATA controller provided by the manufacturer. In case you did not find any floppy inside the motherboard package or you cannot locate them on the mainboard installation CD, you can consult the manufacturer’s website to download the latest versions. To do the trick I have been talking about, it is assumed that you already have a Windows installed on an IDE drive. In case you don’t, pay a visit to a friend and ask him to let you use his computer. It won’t take too much time, I guarantee.
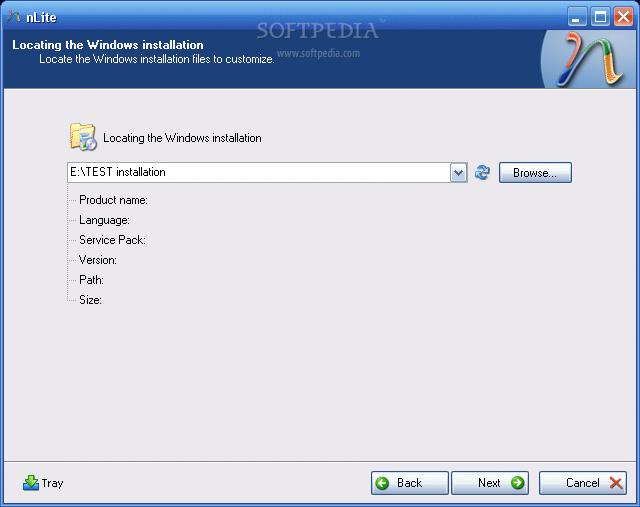
So, download the drivers and unzip them (in case they come archived) in a desired location. Then download and install the Nlite application. When you start the Nlite application, you will be asked to provide the location for the Windows installation package. Insert the genuine Windows Installation CD into the CD drive and, inside the application, select the CD drive letter.
To insert the SATA drivers within the installation package, you need to have it saved on the HDD. Hence, when the warning window appears click OK and select the destination folder for the files to be saved. Make sure that the destination partition / HDD has enough space to store the contents of the installation CD.
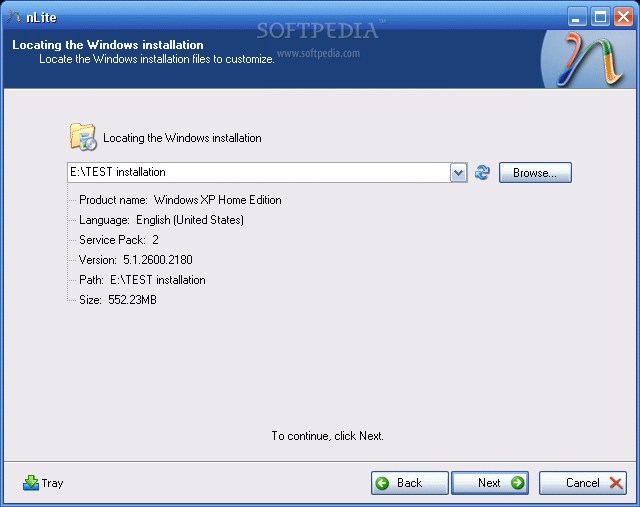
I tested a Windows XP Home Edition and it seems that it required about 566 MB. Immediately after you have chosen the destination folder, the application will start copying the Windows installation files. When finished, it will display some version information regarding the newly copied Windows Installation Package.
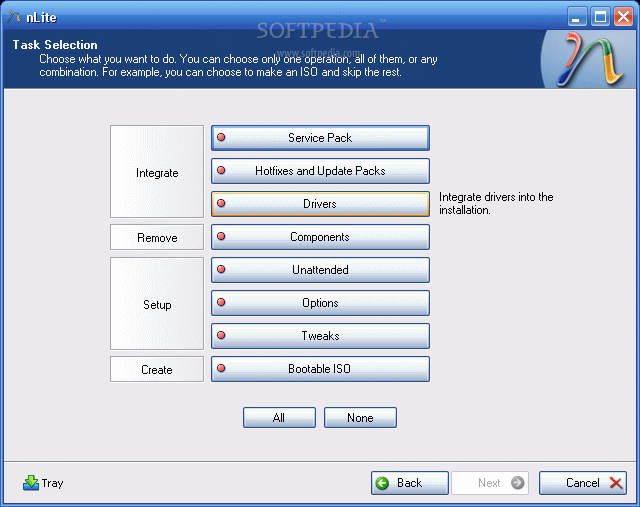
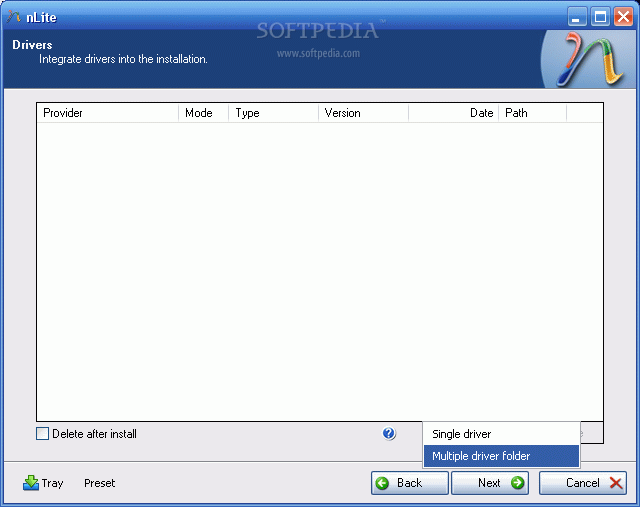
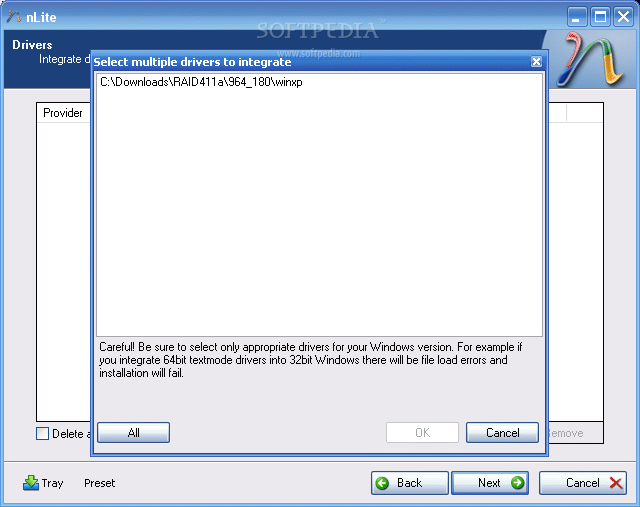
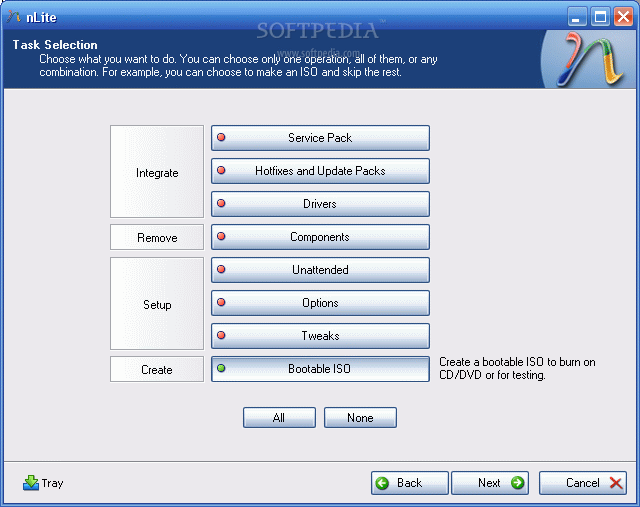
Now, click next twice until you get to a screen where you get options sorted in 4 categories: Integrate, Remove, Setup, Create. We are interested in the integration procedure, therefore select the Drivers button and click next. From the next menu window, click Import and select multiple drive folder option from the drop down menu. This option permits you to browse to the location where the downloaded drivers are found.
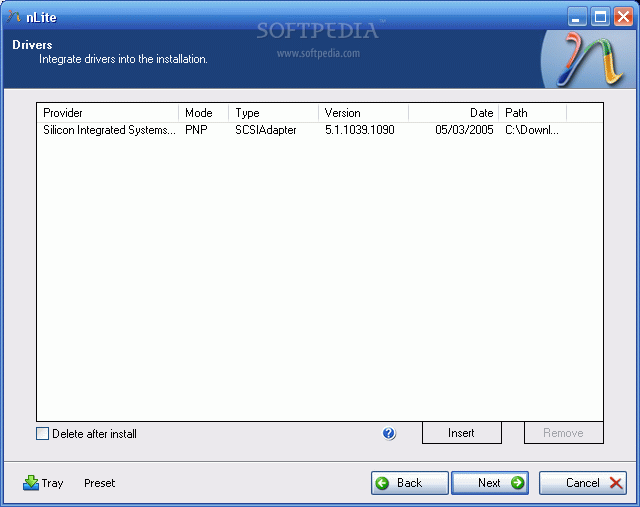
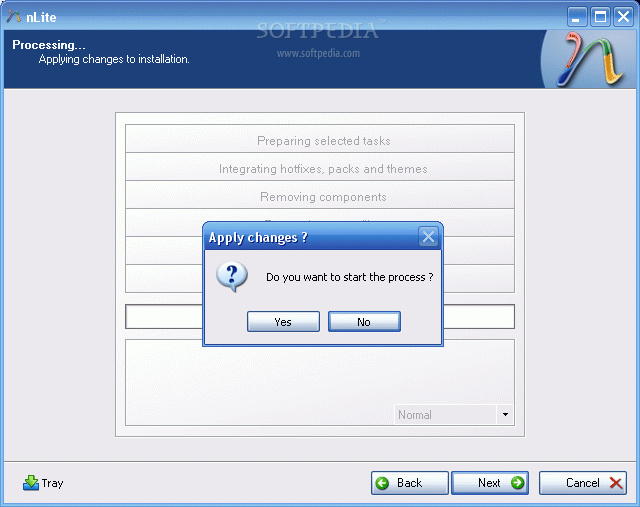
Select the containing directory and click next. You will get a list with the available drivers (in case there are more than one) or simply one driver. Select it (them) and click next. Now the application will ask for the permission to start the integration procedure. Choose Yes and wait for the drivers to be inserted into the installation package.
 |  |  |
 |  |  |
 |  |  |
With problematic driver being included in the installation package you can install Windows XP on your SATA HDD…but…the installation package is on the HDD. You need a bootable CD in order to start an installation. Don’t worry, once the installation package has been adorned with additional user selected drivers it can be transformed into a bootable disk image and later burned on a CD. To encapsulate the installation into a ISO image use the same Nlite application.
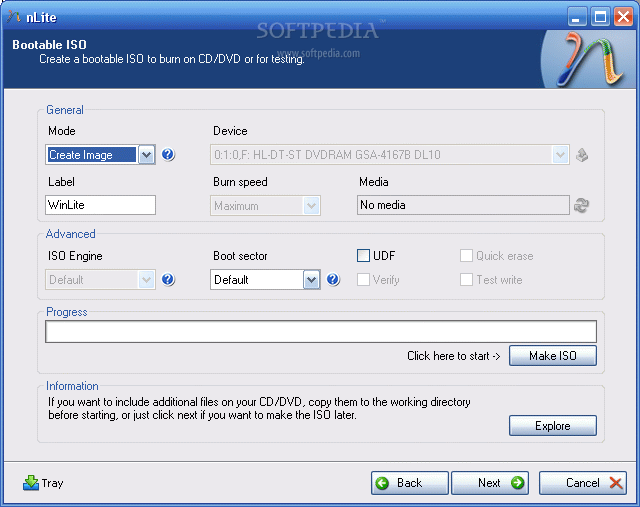
Open it, make sure the HDD installation folder is selected and click next. Select “Last session” preset and click next again. Now from the options menu choose Bootable ISO and click next. In the following window, make sure that the mode is set to “Create Image” and click Make ISO. A destination folder is required where the resulting ISO image will be saved. Once the image saving process finished you have the freedom to burn it on a blank CD with whatever you favorite CD burner software may be.
 |  |
The new CD will be the twin copy of the Windows Installation CD but with one difference, it includes the SATA driver.
reference :
Best Peer to Peer (P2P) File Sharing Programs and Applications
Traditional Downloading of programs and application from a website has become outdated as well as there are not many website providing free software for download. Another medium for downloading and sharing of files is peer to peer file sharing Networks & Programs and it has grown to tremendous level with many networks having more then millions of users to share software’s, Music files, Videos and Programs etc.
With increase in popularity of Peer to Peer (P2P) network it has become one of medium for spreading of Viruses, Spyware, Ad ware, Malware thru this file sharing applications. Users are seeking for clean, Safe, Fastest and Best p2p file sharing applications.
After searching for hours on google I have got big list of safe and best peer to peer (P2P) program and application.
Top 20 Best p2p (Peer to Peer) File Sharing Applications and Programs
1) Bittorrent :

2) Limeware:

Supported Operating System: Windows, Linux, Mac
Download Limeware Client
3) Shareaza:

Shareza has billions of users and uncountable numbers of files shared across shareaza network
Supported Operating System: Windows XP, Vista
Download Shareaza Client
4) Kazaa:

However kazaa has been continually trying to make Kazaa network virus and spyware free with many new features like built in virus scanner, infected file blocking made available in latest Kazaa Client to protect users.
Kazaa Lite is one of best client of Kazaa P2P network for file sharing.
5) iMesh:

Personally I liked iMesh for downloading music and videos but haven’t found it good for downloading any freeware software or application.
Supported Operating System: Windows XP, Vista
Download iMesh Client for Windows
6) Bearshare Lite:

Bearshare is good for downloading music and mp3 files
Download BearShare Client for Windows
7) eMule:
 eMule is one of the biggest and most reliable peer-to-peer file sharing clients
around the world thanks to its open source support and based on edonkey2000 client.
eMule has Multilanguage support with ability to connect to multiple servers and intelligent file corruption detection system to help you in getting genuine files. eMule is free from spyware, adware and its completely free.
eMule is also available in portable form to run from your USB derive
Supported Operating System: Windows XP, Vista
Download eMule Client
8 ) KCeasy:
 KCeasy is client based on giFT peer to peer file sharing protocol. This protocol improves the overall usability of peer to peer network, ability to downloads single file from multiple peers simultaneously.KCeasy supports multiple networks for file sharing.
Supported Operating System: Windows XP, Vista
Download KCeasy
9) Ares Galaxy:

I haven’t got any infected files or corrupted installer. Ares List is used more then normal Ares client because of its low size, speed and performance.
Supported Operating system: Windows XP, Vista
Download Ares for Windows
10) Soulseek:
 Soluseek central server type of P2P file sharing application. Soluseek is good old p2p file sharing program best of sharing music files. i haven’t tried soluseek ever but have heard that soluseek is best of music, audio, Mp3 files download.
Supported Operating system: Windows XP, Vista
Download Souleseek Client
11) WinMX

WinMX network has limited number of Viruses and also it has restriction of maximum file size can be shared is 2 GB only.WinMX is mojouly used for audio and video file sharing but you can use it for sharing any types of files.
Supported Operating system: Windows XP
Download WinMX
12) Piolet:

Free version of piolet shows ads and has no search functionality. i really doubt whether this can become good P2P file sharing program.
Supported Operating System: Windows XP
Download Free Piolet client
13) Gnutella:

Gnutella has strong user base with less number of infected files present in file sharing network.
Supported Operating System: Windows, Linux, Mac
14) Overnet:

Supported Operating System: Windows Linux, Mac
Download Overnet client
15) Azureus now called as Vuze

Supported Operating System: Windows Linux, Mac
Download Vuze client
16) FrostWire:
 Frostwire is like Vuze is another most popular bittorrent client as well as p2p file sharing client which supports Gnutella, Gnutella2, EDonkey Network. it’s completely free from virus and spyware with iTunes integration.
Supported Operating System: Windows, Linux, Mac
17) uTorrent :
 uTorrent is lightweight efficient bittorrent client with lot many features like RSS downloader, Multiple simultaneous downloads downloading, Bandwidth configuration and IPv6 support.
Supported Operating System: Windows XP, Vista, 98, NT
Download uTorrent Client
18) Morpheus:
 Morpheus is free p2p file sharing program with many features like search, easy user interface, No spyware, Popups or ads. Latest version of Morpheus also supports P2P Streaming media for video and audio.
Supported Operating System: Window Xp/Vista
Download Morpheus Client
19) ANts:
ANts is written Java hence it’s supports all types of operating system.Ants is still in beta and not many users are using it
Download ANts peer 2 peer file sharing client
20) Acquisition:

This is one of dedicated P2P software which runes only on Mac OS X.
If know any other free peer to peer (P2P) file sharing Application/Program then please post in below comment.
How To View Myspace Private Profiles...?
Myspace Private Profiles can be easily view with MySpace Private Profile Viewer.
Social Networking Websites are most popular and mostly used by youngsters around the world. Popularity of social Networking websites like Facebook, Myspace, Orkut is not unknown to us.
Most important part in any social networking websites is maintaining privacy of users. Since profiles of any user on this social networking website is publicly accessible hence can be misused by any one. Myspace lets you to set your profile as private or open for all.
Once you set your profile as private, no one can view the users pictures, comments, information or anything about that user. In order to view private profile of any user on Myspace you have to be a friend of that user.
Here is one application Myspace Private Profile Viewer which lets you to view Myspace Private Profiles easily without need to be added as friend. With Myspace Private Profile Viewer you can secretly view any private profile by just providing user profile name.
Screenshots of Myspace Private Profile Viewer

Myspace private profile viewer is paid software and casts around $30. but you can try demo version before purchasing.
Search & Download Movie Subtitles with Freeware Sublight
We all love to watch Movies in our regional languages, the language which we can understand easily then only you can enjoy that movie. But chances are high that movie of your choice may not be available in your regional languages then only option is left to have subtitle of that movie in your language.
Searching Subtitles of movies & Videos might be difficult as well as time consuming for non-technical users. Here is nice application Sublight 0.9.4 which will simplify this subtitle search task Sublight is freeware desktop application which allows you to Search & download subtitles for your movies.
Sublight currently supports 27 languages for which you can search and download subtitles for Movie and Video. You can Search Subtitles with various criteria like Movie Title, Year of Release, and Season.
Features of Freeware Sublight 0.9.4
1) Auto & manual subtitle search along with subtitle ratings and commenting
2) Preview subtitle before download,
3) Windows Explorer integration (optional),
4) Video playback for downloaded subtitles (with just one double click),
5) Auto update capability,
6) Plugin framework for searching subtitles from other sources (plugin for Podnapisi.NET database is included),
7) Support for OpenSubtitles.org and Podnapisi.NET database,
Screenshot of Freeware Sublight 0.9.4

Activate Windows 7 Pre Beta 6801 without Crack or Product Key
15 Windows 7 Activation Keys Which you can use to activating your Windows 7
J7PYM-6X6FJ-QRKYT-TW4KF-BY7H9
D67PP-QBKVV-6FWDJ-4K2XB-D4684
HQDKC-F3P6D-C9YYM-HRB89-QDBB7
76DX2-7YMCQ-K2WCP-672K2-BK44W
2RG93-6XVFJ-RKHQ7-D2RTT-3FMQT
TT63R-8JGWP-WWT97-R6WQC-4CVWY
YQJX6-D6TRM-VWBM7-PHDJK-YPXJH
Q7J7F-GQHBT-Q42RQ-2F8XV-2WKKM
KH4X7-JY8G7-RCD7G-BYDJW-YTPXH
WYBJ8-8QVP3-24R82-VV2VP-72Q9W
9DP2R-W78GJ-GJBKW-CKR46-H3WYT
CXB7F-WWCM4-BP9V3-2YH43-RK8Y6
W9BYV-K2TB8-4YDJT-QBQWP-KFDHB
WGDJW-B8DYC-WVKX4-6MKF4-B8PK8
2PHXF-9PBDW-D3WWY-CPDKD-XG87V
Windows 7 announced at recent Microsoft PDC 2008 event, with the announcement and screenshots of windows 7 users are becoming impatient to try and test windows 7. Thought windows 7 is not available for downloaded for normal users but leaked version of windows 7 Pre beta torrents are spreading very fast.
You may download windows 7 Pre Beta 6801 but you will need to activate windows 7 to actually enjoy unrestricted features of windows 7. As said earlier for normal users it’s impossible to get activation key or Product Keys for windows 7 and there are no cracks for windows 7 activation is available yet.
You can complete installation of windows 7 by leaving product key filed blank and enjoy Windows 7 Pre Beta 6801 for 30 days maximum before it gets expiry. The only way to activate windows 7 Pre Beta is by using product key for Windows Vista beta or RC edition.
Microsoft gave out free beta product key of windows vista RC 1 and RC 2 to the user who has participated Windows Vista Customer Preview Program. The product Key was arrived in the email from service@microsoft.com that titled with subject of “Microsoft Windows Vista Beta 2 Order Confirmation and Product Key”, “Microsoft Windows Vista RC1 Product Key” that looked similar to this:
**********************************
Please keep this e-mail for your records.
**********************************Thank you for your interest in Microsoft Windows Vista RC1. Your Product Key is included at the bottom of this message. You may install RC1 on up to 10 PCs using the same Product Key.
To help answer questions you may have related to installation and use, we have created newsgroups for Windows Vista RC1. To join or read postings in these newsgroups please visit http://windowshelp.microsoft.com.
For the latest information on Windows Vista, please visit http://go.microsoft.com/fwlink/?LinkID=65938.
Thank You,
MicrosoftProduct Key:
XXXXX-XXXXX-XXXXX-XXXXX-XXXXX
To activate Windows 7 online, just enter the product key in Control Panel -> System and Security - System Properties by clicking on Activate Windows now or Change product key link.
Please keep in mind that even after successful activation of windows 7 Pre Beta it will still expiry on August 1, 2009.
How to hack DeepFreeze... ?
 Deepfreeze does NOT place any restrictions on a machine, so whatever you want to do, whether it's downloading mp3's or downloading and installing ICQ or browser add-ons or WHATEVER, deepfreeze does not prevent it. What matters much more is how you are logged in: as User, or Power User, or Administrator. True, you'll have to install/download your stuff every time you sit down at the computer, but hey! you CAN do so. That's the beauty of deepfreeze: it places no restrictions onthe machine. Take a look at M$ TechNet:
HKLM(HKEY_LOCAL_MACHINE)
in the registry, and can manipulate a lot more onthe system (read the paper). For example, let's say there is a nastycontent filtering program such as CyberPatrol preventing you fromaccessing 2600 or other web sites. Such a program probably startsautomatically from a key in HKLM under
HKEY_LOCAL_MACHINE\SOFTWARE\Microsoft\Windows\CurrentVersion\Run
Simply delete the key and then restart the computer, and the program will not be running. So... try to become a Power user. If you explain to your teacher that being just a User is a real pain in the butt and that you NEED to be PowerUser in order to do things, he/she MIGHT make you one. You don'tknow until you try.
On Windows 95/98/Me:
c:\windows\system\iosubsys\persifrz.vxd
The only hope for most hackers of "hacking" DeepFreeze is to boot from a boot-disk and delete this file. All the other filez in c:\progra~1\hypert~1\deepfr~1 arejust other program filez. The most important file to delete is the actual DeepFreeze driver, persifrz.vxd. It IS true though, that if you delete the other filez in the DeepFreeze folder FROM A BOOT DISK thatDeepFreeze will no longer load. i'm just giving you the best andeasiest way. Delete persifrz.vxd and DeepFreeze is deader than a doorknob. AND it's only one file. persifrz.vxd IS DeepFreeze.
There are 2 drivers and 1 service (i'll let you figure out the paths):
DepFrzLo.sys (kernel driver)
DepFrzHi.sys (filesystem driver)
dfserv.exe (service)
frzstate.exe (password dialog)
persis00.sys (password file and "on/off switch")
True: there is a free LINUX boot-disk which also mounts NTFS drives, but it's not nearly as good. One last thing about NTFSDOSPRO. There is no free support AND it is kinda tricky creating and using the NTFSDOSPRO boot disk. You have to first boot with a regular boot disk, then put in your NTFSDOSPRO boot disk to mount the NTFS drive. You'll see what I mean, it's not very user-friendly and little explanation is given on how to really gothrough with the entire operation.
Use In Ctrl5 to monitor your own installation of DeepFreeze 2000/XP. Available here:
HKEY_LOCAL_MACHINE\SOFTWARE\Microsoft\Windows\CurrentVersion
which must be deleted in order to be able to re-install a fresh trial version of DeepFreeze. One starts with Rebar, and i'll let you figure out the other one. It may be only the Rebar that is necessary to delete.
JUST ONE FILE:
Think about it:
http://groups.google.ca/groups?q=author:jn...ogle.com&rnum=1
LightScribe CD/DVD Media...
 LightScribe enables drives to burn a silk-screen-like, high-contrast label on the topside of CD or DVD media with a LightScribe dye coating. So now you can apply direct-disc labeling your DVD/CD media neatly. HP originally created the Lightscribe technology to use the same laser that burned the data to make the label for the other side of the disc. After completing a data burn, users are prompted to flip the disc over so they can burn a label onto it.
Source :
http://www.supermediastore.com/lightscribe-light-scribe-dvd-r-cd-r-media.html
Windows 7 Selepas Vista...?
Ditulis Pada September 24, 2008 – 12:02 am | Oleh pak_aen |

Tak sampai beberapa tahun Vista dipasaran, dah muncul yang baru…Nama asal bagi Windows 7 ni diambil dari nama kod iaitu “Blackcomb” kemudian pada awal 2006 dinamakan semula dengan “Windows Vienna” dan kemudian ditukar kepada “Windows Seven” atau “Windows 7” dimana Windows ini dijangkakan akan menggantikan Windows Vista.
- Windows 7
- Windows 6 – Windows Vista
- Windows 5 – Windows XP
- Windows 4 –NT 4.0
dan seterusnya anda boleh lihat Video Eric Traut mengenai versi Windows nie..
Seperti nama2 sebelum nie, Windows 7 ni bukanlah nama tetap dan masih dalam perancangan..Ia mungkin akan berubah mengikut kesesuaian. Versi- versi klien Windows 7 ini akan dikeluarkan dalam kedua2 versi 32-bit dan 64-bit.
Ia menggunakan MinWin kernel dimana ia hanya menggunakan 25mb ingatan daripada ruang cakera dan menjalankan operasi bekerja menggunakan 40mb ingatan.
Ketika ini Microsoft lebih memfokuskan kepada satu ciri bagi Windows 7 iaitu pervasive multi-touch..Dan syarikat ini masih lagi belum membuat keputusan sepenuhnya tentang rekabentuk dan ciri2 yang akan digunakan pada sistem operasi mereka ni…Kumpulan yang bertanggungjawab merekabentuk atau mencipta Gui [ graphical user interface ] bercadang untuk mengambil kira beberapa UI [ User Interface ] baru dalam Windows 7. Salah satu kumpulan yang terlibat dalam pembangunan ini ialah kumpulan yang sama yang merekabentuk Ribbon User Interface dalam Office 2007…Adakah Window 7, macam Office 2007???..menarik gak… 
Masih awal lagi untuk Mirosoft meceritakan lebih mendalam tentang Windows 7 nie..Apa yang diketahui secara ringkasnya pengganti Vista ni lebih kecil, ringan dan cepat dari Vista… Bill Gates said that would “be lower power, take less memory, be more efficient, and have lots more connections up to the mobile”.
Windows 7 - Apakah keistimewaannya..?
Windows 7 atau windows seven yang digadang-gadang oleh microsoft itu beberapa waktu yang lalu dipamerkan di Professional Developers Conference sebuah konferensi untuk para developer. Nah, pada even tersebut, windows 7 dipamerkan dan di test kemempauannya. Berikut beberapa point penting dari pengujian tersebut.
Lebih Cepat dan Stabil daripada Vista
Windows 7 ini memiliki performa yang lebih stabil daripada windows vista. Seven juga lebih responsif dan lebih hemat dalam penggunaan baterei. Meskipun belum ada pernyataan resmi mengenai spesifikasi minimum untuk dapat menggunakan windows 7, namun Steve Sinofsky (apanya steve balmer ya..) menyatakan windows 7 hanya membutuhkan alokasi memori minimal 1Gb saja.
Memilih Jaringan Wireless Hanya dengan 1 klik dari system tray

Ini dia salah satu fasilitas yang cukup penting dari windows 7. Langkah yang lebih praktis dalam memilih jaringan wireless. Hayoo ngaku siapa yang selama ini bingung untuk mengkoneksikan laptopnya ke wireless?? Harus masuk control panel lah, masuk ke network connection, dan seterusnya sebelum bisa konek ke jaringan wireless.
Akan ada peringatan jika ada yang berubah dengan komputer anda
Saya pernah mengalami kebingungan saat adik saya yang berumur 7 tahun bermain laptop saya dan menguninstall salah satu program yang biasanya saya pakai. Saya cari-cari kok gak ketemu ya.. Eh, ternyata udah di uninstall.. Nah,, fitur windows 7 yang satu ini mencegah anda mengalami kebingungan dengan masalah seperti saya tadi. System akan melaporkan jika terjadi perubahan terhadap komputer anda. Anda akan mendapatkan peringatan saat system ada yang berubah dan anda juga bisa mensetting tingkat privasi tersebut. Mulai dari “tell me everything” sampai “don’t tell me squad”
Sidebar Hilang, Gadget Beterbangan

Salah satu hal yang membedakan windows vista dengan windows Xp adalah adanya sidebar. Sidebar ini berisi gadget-gadget dan aksesoris untuk komputer anda. Pada windows 7, sidebar ini hilang. Tapi, gadget-gadget tersebut tetap ada, bebas berkeliaran sesuai keinginan anda.
Library Akan Mengumpulkan System dengan Type yang sama

Saya pernah mengalami masalah dengan file saya yang berantakan di My Document. Saya bingung mencari sala satu file tugas kuliah yang harus segera dikumpulkan. Terpaksa saya harus mencarinya di semua folder yang ada di my document. Maklum, saya lupa dimana meletakkannya. Nah, masalah ini rupanya juga dipahami oleh pembuat windows 7. Fitur baru mereka antara lain adanya library yang akan mengorganisasikan dokument anda berdasarkan type. Tidak peduli letaknya dimana. Semua dokument pdf misalnya. sekalipun letaknya di D:/ di my Document, atau di manapun letaknya akan diorganisasikan oleh library widows 7.
Dan.. tentunya masih banyak fitur-fitur lain yang ada di windows seven. Hanya saja bagi anda yang telah memakai MAC atau LINUX, fitur-fitur tersebut ada yang sudah ada. Seperti gadget-gadget yang berkeliaran, fitur ini sudah ada di MAC (saya lupa seri mana yang pertama kali menawarkan fitur ini).
Sumber: Mengintip Windows 7: apa sih istimewanya? - ShiroGadget Sponsor: Game Flash Gratis
Adding multiple titles/movies to 1 DVD using Nero Recode 2

Software you will need:
- Nero Recode 2
| Title: Purchase Nero Recode Link: Download Description: Purchase Nero Recode as part of the Nero 7 package | |
| Title: NeroDigital_RC-2.2.6.17c.exe Link: Download Size: 14.95 MB Description: Download the freeware version of Nero Recode 2.2.6.17c |
Possible uses for this guide:
- Adding 2 or more DVD's to 1 DVD-R or DVD+R
- Joining a double sided DVD (meaning you have to take the disc out and flip it over to watch the rest) to a single sided DVD-R or DVD+R
- Taking 2 different movies & creating 1 DVD out of them


DONE! Enjoy your multi title/movie DVD!
Article taken from http://www.dvdr-digest.com


